6wind Turbo Router是一个软路由系统,不过是基于Ubuntu的,并且看起来魔改得不厉害。朋友发了我一个2.0.2版本的系统镜像,于是装上玩了玩。
系统要求
官方文档
硬件:
- 物理机或虚拟机(KVM,VMWare)
- Virtio vNIC, VMXNET3, PCI (Peripheral Component Interconnect) passthrough and SR-IOV (Single Root I/O Virtualization)
支持的处理器:
- Intel Xeon E5-1600/2600/4600 v2 family (Ivy Bridge EP)
- Intel Xeon E5-1600/2600/4600 v3 family (Haswell EP)
- Intel Xeon E5-1600/2600/4600 v4 family (Broadwell EP)
- Intel Xeon E7-2800/4800 v2 family (Ivy Bridge EX)
- Intel Xeon E7-2800/4800 v3 family (Haswell EX)
- Intel Xeon E7-4800/8800 v4 family (Broadwell)
- Intel Xeon Platinum/Gold/Silver/Bronze family (Skylake)
- Intel Atom C3000 family (Denverton)
- Intel Xeon D-1500 family (Broadwell DE)
支持的网卡:
- Intel 1G 82575, 82576, 82580, I210, I211, I350, I354 (igb)
- Intel 10G 82598, 82599, X520, X540 (ixgbe)
- Intel 10G/40G X710, XL710, XXV710 (i40e)
- Mellanox 10G/40G Connect-X 3 (mlx4)
- Mellanox 10G/25G/40G/50G/100G Connect-X 4/5 (mlx5)
- Broadcom NetExtreme E-Series (bnxt)
内存占用:需要6GiB内存以达到以下需求
- VRS(Virtual Routers): 32
- Routes: 1000000
- Neighbors: 100000
- PBR rules: 4096
- Netfilter rules: 10000
- Netfilter conntracks: 262144
- Netfilter ebtables: 10000
- Netfilter ipset: 64 per VR (Virtual Router), 2048 entries per ipset
- VXLAN interfaces: 512
极限测试
系统基础功能正常的最小配置:
- VMWare Workstation虚拟化
- i7-4860HQ,1 vCore
- 768MiB RAM
- 380MiB HDD
低于768MiB内存的话,系统仍然能启动,但是sysrepod会死掉或者模块加载不成功,导致CLI完全无法使用。
CLI基础
6wind路由用户的登录shell是nc-cli,它是一个NETCONF客户端。这个shell的基本提示符是:
- 命令模式:
> - 编辑模式:
# - 编辑模式(缺少必需的配置):
#!
另外和大多数网络设备的shell不同的是,nc-cli不会自动补全你打了一半的命令,你必须按tab键显式补全。这个设定虽然感觉有所不便,但是从根本上避免了命令简写出现歧义。
安装
从ISO启动,等待系统提示登录。
首先我们需要看一下安装目标设备。输入用户名root密码6windos登录以获得一个Linux shell,然后用lsblk命令找到目标硬盘的设备名(我这边是vda)。完成以后exit。
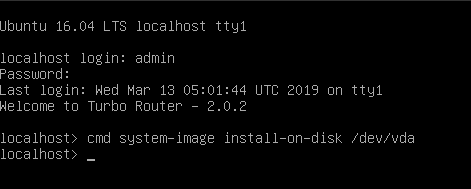
然后使用用户名admin密码admin登录以获得路由器的默认shell,输入安装命令:
|
1 |
cmd system-image install-on-disk /dev/vda |
等待命令返回(如果没有出错,此命令不会有任何输出),移除光盘,重新启动,从硬盘引导即可。
初始设置
设置Hostname
|
1 2 3 4 5 6 |
localhost> edit running localhost running config# system localhost running system# hostname james-test-router0 localhost running system# commit Configuration committed. localhost running system# exit |
维护用户
维护用户是能拿到Linux shell的,默认只有一个root,默认密码是6windos。这个用户也是能SSH登录的,所以建议立即修改密码。修改密码的方法就是用该用户登录,然后进去passwd,流程和正常的Linux完全一样,不再细讲。
路由用户
系统默认会有两个用户:
| 用户名 | 密码 | 角色 |
| admin | admin | admin |
| viewer | viewer | viewer |
如果只是想更改密码,可以这么做:
|
1 2 3 4 5 6 7 |
james-test-router0> edit running james-test-router0 running config# system auth user admin james-test-router0 running user admin# role admin james-test-router0 running user admin# password Enter value for password> james-test-router0 running user admin# commit Configuration committed. |
注意:改密码的时候一定要写role admin!不然role会变成默认的viewer;若你没有别的管理员账户,那你就等着重装吧。
如果想直接禁用掉系统默认用户,那么首先需要至少创建一个新管理员:
|
1 2 3 4 5 6 7 8 |
james-test-router0> edit running james-test-router0 running config# system auth james-test-router0 running auth# user james james-test-router0 running user james# role admin james-test-router0 running user james# password Enter value for password> james-test-router0 running user james# authorized-key "ssh-rsa AAAA..." james-test-router0 running user james# commit |
然后禁用系统默认用户(admin和viewer):
|
1 2 3 4 |
james-test-router0> edit running james-test-router0 running config# system auth default-users-enabled false james-test-router0 running auth# commit Configuration committed. |
这里需要注意的是,SSH key不能用ed25519之类的新算法,虽然系统自带的sshd支持,但是配置工具不支持呀。如果你不慎配置了系统不支持的算法,下次开机你就做不了任何操作了:
|
1 2 3 |
james-test-router0> edit running Not connected to NETCONF server. Command <edit running> returned an error |
解决方法也很简单。首先用root用户登录系统,用文本编辑器打开/etc/sysrepo/data/ietf-system.startup,删掉里面相应的key。
然后重新启动两个服务:
|
1 2 3 |
systemctl stop netopeer2-server systemctl restart sysrepo systemctl start netopeer2-server |
最后回到你原来的用户下,重新连接一下NETCONF:
|
1 |
james-test-router0> netconf connect |
就可以啦。进去以后记得删掉那行配置:
|
1 2 3 4 5 |
james-test-router0> edit running james-test-router0 running config# system auth user james james-test-router0 running user james# del authorized-key "ssh-ed25519 AAAA..." james-test-router0 running user james# commit Configuration committed. |
网络
如果你足够幸运,DHCP或者cloud-init(没错,它甚至支持cloud-init)可能已经帮你设置好了网络。使用show state vrf main interface physical命令查看当前的IP设置:
|
1 2 3 4 5 6 7 8 9 10 11 12 13 14 15 16 17 18 19 20 21 22 23 24 25 26 27 28 29 30 31 32 33 34 35 36 37 38 39 40 41 42 |
james-test-router0> show state vrf main interface physical physical ens3 mtu 1500 promiscuous false enabled true port pci-b0s3 rx-cp-protection false tx-cp-protection false oper-status UP counters in-octets 7575362 in-unicast-pkts 123765 in-discards 13 in-errors 0 out-octets 7575362 out-unicast-pkts 2152 out-discards 13 out-errors 0 .. ipv4 address 192.0.2.2/24 neighbor 192.0.2.1 link-layer-address 00:00:5e:00:00:01 state reachable dhcp enabled true current-lease fixed-address 192.0.2.2 renew "4 2019/06/27 00:40:33" rebind "4 2019/10/17 23:04:42" expire "1 2019/11/18 05:04:42" .. .. .. ipv6 address fe80::0200:5eff:fe00:0002/64 neighbor fe80::0200:5eff:fe00:0001 link-layer-address 00:00:5e:00:00:01 router true state stale .. ethernet mac-address 00:00:5e:00:00:02 auto-negotiate false port-speed unknown .. .. |
如果没有相应的设置或者设置有误,就得手工配置了。
手工配置Interface
只有在interface没有默认创建的情况下才需要手工创建interface。Interface的名字和物理地址不是默认对应的,首先要查找到interface的物理路径:
|
1 2 3 4 5 6 |
james-test-router0> show state network-port network-port pci-b0s3 pci-bus-addr 0000:00:03.0 vendor "Red Hat, Inc" model "Virtio network device" .. |
然后创建interface,并assign对应的物理路径:
|
1 2 3 4 5 6 7 8 |
james-test-router0> edit running james-test-router0 running config# vrf main interface physical eth0 # 这里可以使用 tab 补全 james-test-router0 running physical eth0#! port pci-b0s3 james-test-router0 running physical eth0# commit Configuration committed. |
手工配置IPv4
静态:
|
1 2 3 4 5 6 7 |
james-test-router0> edit running james-test-router0 running config# vrf main interface physical eth0 james-test-router0 running physical eth0# ipv4 address 192.0.2.2/24 james-test-router0 running physical eth0# / vrf main routing static james-test-router0 running static# ipv4-route 0.0.0.0/0 next-hop 192.0.2.1 james-test-router0 running static# commit Configuration committed. |
DHCP(默认对第一个interface是开着的):
|
1 2 3 4 5 |
james-test-router0> edit running james-test-router0 running config# vrf main interface physical eth0 james-test-router0 running physical eth0# ipv4 dhcp enabled true james-test-router0 running static# commit Configuration committed. |
配置完测试一下:
|
1 2 3 |
james-test-router0> cmd ping 1.1.1.1 PING 1.1.1.1 (1.1.1.1) 56(84) bytes of data. 64 bytes from 1.1.1.1: icmp_seq=1 ttl=57 time=2.70 ms |
手工配置IPv6
静态:
|
1 2 3 4 5 6 7 |
james-test-router0> edit running james-test-router0 running config# vrf main interface physical eth0 james-test-router0 running physical eth0# ipv6 address 2001:db8::2/64 james-test-router0 running physical eth0# / vrf main routing static james-test-router0 running static# ipv6-route ::/0 next-hop 2001:db8::1 james-test-router0 running static# commit Configuration committed. |
同样配置完测试一下:
|
1 2 3 |
james-test-router0> cmd ping 2001:4860:4860::8888 PING 2001:4860:4860::8888(2001:4860:4860::8888) 56 data bytes 64 bytes from 2001:4860:4860::8888: icmp_seq=1 ttl=60 time=1.88 ms |
系统服务
SSH
SSH默认是开着的,这里演示一下怎么开:
|
1 2 3 4 5 6 7 |
james-test-router0> edit running james-test-router0 running config# vrf main ssh-server james-test-router0 running ssh-server# enabled true james-test-router0 running ssh-server# address 0.0.0.0 james-test-router0 running ssh-server# port 22 james-test-router0 running ssh-server# commit Configuration committed. |
保存配置
在一切都配置妥当以后,记得保存一下:
|
1 2 |
james-test-router0> copy running startup Overwrite startup configuration? [y/N] y |
其他常用操作
- 关机
cmd shutdown delay 0 - 重启
cmd reboot delay 0
